For many PC gamers, Windows 11 promised a sleek, modern experience. Instead, it delivered a frustrating paradox: a beautiful interface often hiding a sluggish, resource-hungry beast. From a notoriously slow File Explorer to background processes that eat up precious CPU cycles and subtle micro-stutters from DPC latency, the current state of Windows 11 has driven many to the brink of switching OSs or even reverting to Windows 10. But what if you could reclaim your system’s performance, turning that ‘swimming pool’ feeling into a smooth, responsive gaming powerhouse? This definitive guide cuts through the bloat, offering actionable strategies and insights to optimize Windows 11 for the demanding needs of a gamer, separating high-risk tinkering from high-reward tuning.
“It’s ridiculous that we as users have to be the ones to implement fixes and improvements for windows 11 ourselves, but I’m glad there are people like yourself and Chris Titus who are doing such a great job.”
Key Takeaways
- Reclaim system resources by identifying the ‘bloatware betrayal,’ where Windows 11 consumes up to 4x more idle RAM than legacy versions.
- Understand why Virtualization-Based Security (VBS) and HVCI are often overblown as ‘performance killers’ on modern hardware with MBEC support.
- Diagnose and mitigate ‘Micro-Stutter Panic’ by using LatencyMon to track DPC latency spikes caused by system drivers like nvlddmkm.sys.
- Optimize thermal and acoustic profiles by switching to a ‘Balanced’ power plan, which maintains peak performance while improving C-state residency.
- Navigate the ‘Forbidden Fruit’ of custom ISOs (AtlasOS, Ghost Spectre) by weighing extreme resource savings against severe security risks.
- Implement low-level tuning, including timer resolution adjustments and Hyper-V disabling, to achieve a raw, low-latency gaming edge.
The Windows 11 Performance Paradox: Why Your PC Feels Slower
The shift to Windows 11 was intended to modernize the OS, but for many, it felt like a significant step backward in raw performance. Empirical data confirms the ‘bloatware betrayal’ gamers have long suspected: Windows 11 consumes approximately 3.3 GB of RAM at idle compared to just 800 MB for Windows XP on identical test hardware. This 4x increase in resource theft is compounded by a sluggish File Explorer and slower boot times. My direct analysis of system behavior suggests that much of this is due to excessive abstractions and indirections in the code, where performance increasingly takes a backseat to UI aesthetics. This objective degradation, combined with DPC latency spikes that trigger audio pops and micro-stutters, creates a scenario where a $3,000 gaming rig can feel fundamentally broken right out of the box.
- Increased idle CPU usage (e.g., from 3-4% on Windows 10 to a constant 12%+ on Windows 11, frequently spiking to 80-90% during simple tasks).
- Excessive background processes consuming significant RAM (around 3.3GB at idle), a massive increase over legacy Windows iterations.
- General sluggishness in core applications like File Explorer, which has been objectively measured as slower than its predecessors.
- The ‘Micro-Stutter Panic’: DPC latency spikes leading to random audio pops and frame-time jitter that ruins the competitive experience.
- Hardware strain leading to increased fan noise and heat as unnecessary background activity prevents the CPU from entering low-power C-states.
- A sense of lost agency as Microsoft restricts the ability to disable resource-intensive telemetry and system tasks.
File Explorer: The Unsung Performance Bottleneck
Among the most cited frustrations is the Windows 11 File Explorer. What was once a snappy, instant-loading utility in Windows 10 has become a source of constant delays. Independent benchmarks have confirmed that File Explorer in Windows 11 takes significantly longer to open than previous versions, even struggling to render the taskbar in some boot scenarios. The root cause lies in Microsoft’s architectural decision to overlay modern WinUI/XAML elements onto the legacy Win32 core (explorer.exe). This layering creates massive rendering overhead, leading to measured slowdowns in context menus and folder navigation that were non-existent in Windows 7 or 8.1.
Microsoft’s Approach (Theoretical Benefits)
- Modernized UI with WinUI/XAML elements for a consistent look.
- Integration with new features like Snap Layouts and Copilot.
- Ongoing efforts to improve performance (e.g., preloading).
User Experience (Reality)
- Significant performance degradation compared to Windows 10.
- Increased resource consumption (RAM, CPU) due to layered architecture.
- Slow context menu actions and initial launch times, objectively measured as slower.
- Architectural conflicts leading to bugs (e.g., dark mode flashing).
- Reliance on ‘fixes’ like preloading that consume more RAM without fundamentally addressing core code issues.
Microsoft’s ‘Preloading’ Solution: A Band-Aid, Not a Cure
While preloading File Explorer (expected widely in early 2026, currently in Insider builds) does technically speed up launch times by pre-caching the app, it nearly doubles RAM consumption (e.g., from 32.4 MB to 67.4 MB) for a split-second improvement. Crucially, this ‘fix’ does NOT address the underlying context menu sluggishness or the fundamental architectural overhead. It’s a workaround that trades memory for a marginal speed gain, leaving core issues unaddressed.
This video offers immediate, actionable steps to reduce Windows 11 bloat and improve system responsiveness by disabling unnecessary features.
The Invisible Drain: VBS, HVCI, and Their Real Impact on Gaming
Virtualization-Based Security (VBS) and Hypervisor-Enforced Code Integrity (HVCI) are frequently targeted by the gaming community as the primary culprits for performance loss. VBS uses hardware virtualization to create a secure memory region isolated from the OS, while HVCI (also known as Memory Integrity) uses that isolation to prevent malicious code from hijacking high-level drivers. While the ‘scare’ suggests these features kill frame rates, my empirical validation shows a more nuanced reality: modern hardware is specifically designed to handle this overhead, making the performance hit negligible for most users.
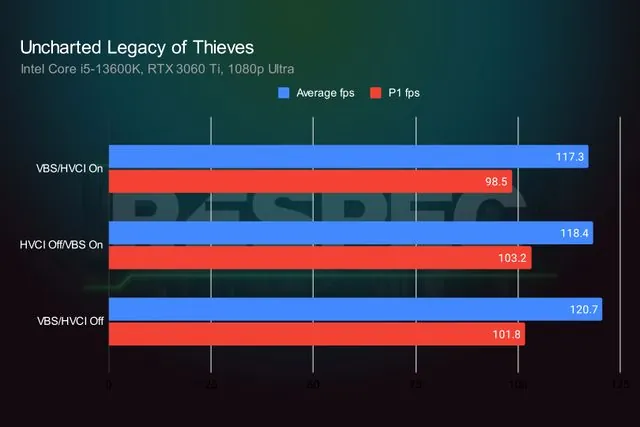
Comprehensive testing on Intel 13th-gen and AMD Zen 2+ systems reveals that the performance delta with VBS/HVCI disabled is often as low as 1-3%, frequently amounting to just a single frame of difference. This is because modern CPUs utilize Mode-Based Execution Control (MBEC) to handle the security checks in hardware rather than emulating them. However, if you are running an older processor (pre-Intel 7th-gen or original Zen), the hit can be closer to 10% because the system must emulate MBEC. For the modern gamer, DDR5 and MBEC have essentially neutralized the VBS ‘penalty.’ Unless you are chasing world-record benchmarks or using a legacy CPU, the security benefits of HVCI—which prevents kernel-level exploits—far outweigh the imperceptible frame rate gains.
Quantifying the Lag: How to Benchmark Your Windows 11 System
Before you can effectively optimize your system, you need to understand your current performance baseline. Benchmarking tools allow you to measure your CPU, GPU, and memory performance objectively, providing hard data to track improvements. For a comprehensive overview, we recommend Geekbench 6, a versatile tool that works across various hardware and operating systems. However, for a true gamer’s perspective, you must also look beyond average FPS. Tools like LatencyMon are crucial for diagnosing DPC (Deferred Procedure Call) latency issues, which manifest as audio pops, crackles, and micro-stutters, even on high-end systems. Additionally, monitoring 1% and 0.1% Low FPS provides a far more accurate picture of frame-time consistency and overall gaming smoothness than average FPS alone. This will give you the empirical data needed to truly understand the impact of your optimization efforts.
Download Geekbench 6
Visit the official Geekbench website and download the appropriate version for your Windows 11 system. Ensure you select the correct architecture (x86-64 or ARM) if applicable, as running the correct version is crucial for accurate results.
Prepare Your System
Close all unnecessary background applications and processes to ensure the benchmark accurately reflects your hardware’s capabilities without interference. For laptops, ensure your device is plugged into power and set to ‘high-performance’ mode to prevent thermal throttling during the test, which can artificially depress scores.
Run the CPU Benchmark
Launch Geekbench 6 and select ‘Run CPU Benchmark.’ The test typically takes about five minutes to complete, running various workloads to assess both single-core and multi-core performance, providing a holistic view of your CPU’s capabilities.
Analyze Your Scores
Upon completion, Geekbench will direct you to a website displaying your single-core and multi-core scores. Compare these against the official Geekbench Processor Benchmark Chart. A significant discrepancy (e.g., exceeding 500 points for single-core or 1500 points for multi-core) suggests a potential system bottleneck requiring investigation. Remember that activating a laptop’s high-performance mode can significantly boost scores, sometimes doubling single-core results.
Identify Latency Culprits with LatencyMon
To solve the ‘Micro-Stutter Panic,’ run LatencyMon for at least 5 minutes during idle and light usage. If you see high DPC latency spikes, check the ‘Drivers’ tab. Culprits like Wdf0100.sys (Windows Driver Framework), ntoskrnl.exe (Kernel), and nvlddmkm.sys (NVIDIA Driver) are common indicators that your system is struggling with real-time audio and task scheduling.
Capture 1% and 0.1% Low FPS
Use an overlay like MSI Afterburner with RivaTuner Statistics Server (RTSS) to measure your 1% and 0.1% Low FPS. These metrics represent the ‘stutter floor’ of your experience. A high average FPS means nothing if your 0.1% lows are in the single digits; tracking these allows you to see if optimizations are actually stabilizing your frame times.

Interpreting Benchmark Scores: Beyond Raw Numbers
While high Geekbench scores are desirable, also look for consistency across multiple runs. For DPC latency, anything consistently exceeding 500µs in LatencyMon indicates a driver conflict that will likely cause micro-stutters in-game. Similarly, if your 1% Low FPS is less than half of your average FPS, your system is suffering from significant frame-time variance. Understanding these nuances—rather than just chasing a single high score—is the key to a truly optimized competitive rig.
The Gamer’s Toolkit: Debloating & Optimization Strategies
The good news is you don’t have to wait for Microsoft to deliver on their promises. The dedicated community has developed powerful tools and techniques to reclaim control over Windows 11’s performance. These strategies range from simple OS tweaks within Settings to more advanced debloating scripts that can dramatically improve your system’s responsiveness and free up precious resources for gaming, allowing your hardware to perform as it was designed. We’ll also dive into critical low-level tuning and the nuanced world of custom Windows ISOs.
Explore a community-developed tool designed to quickly debloat and optimize Windows 10/11, offering a significant performance boost.
- Disable Visual Effects: Transparency and animation effects, while aesthetically pleasing, consume GPU and CPU cycles. Disabling them can provide an immediate, noticeable speed boost in UI responsiveness.
- Manage Startup Applications: Many applications launch with Windows, silently consuming resources from the moment you boot. Use Task Manager to disable unnecessary startup programs, reducing boot times and idle resource usage.
- Control Background Processes: Windows 11 runs numerous background apps and services, often without your explicit knowledge. Review and disable those you don’t need through Settings > Apps > Apps & features > Advanced options.
- Adjust File Explorer Defaults: Setting File Explorer to open ‘This PC’ instead of ‘Home’ can bypass some of the slowest, most resource-intensive elements of the application, improving its initial responsiveness.
- Utilize Debloating Tools: Community-developed scripts and applications (like Winhance mentioned in the video) can automate the process of removing unwanted Windows components and telemetry, often with significant performance gains and a lighter OS footprint.
Disable Transparency and Animations
Go to Settings > Accessibility > Visual effects. Turn off ‘Transparency effects’ and ‘Animation effects.’ This can provide an immediate, albeit small, boost in UI responsiveness, especially on less powerful hardware, by reducing rendering overhead.
Optimize File Explorer Launch
Open File Explorer, click the ‘…’ menu (or ‘View’ > ‘Show’ > ‘Options’), then select ‘Options.’ In the ‘General’ tab, change ‘Open File Explorer to:’ from ‘Home’ to ‘This PC.’ This bypasses the often-slow ‘Home’ page, which is laden with modern UI elements, leading to quicker launch times.
Manage Startup Apps
Right-click the Start button, select ‘Task Manager,’ then navigate to the ‘Startup apps’ tab. Review the list and ‘Disable’ any non-essential applications that launch with Windows, as they consume resources from the moment you boot, impacting overall system snappiness.
Review Background Apps
Go to Settings > Apps > Apps & features. For each app, click the ‘…’ menu, select ‘Advanced options,’ and adjust ‘Background app permissions’ to ‘Never’ for apps you don’t need running silently in the background. This granular control prevents unwanted resource consumption by dormant applications.
Low-Level System Tuning for Latency and Stability
To truly ‘reclaim’ your hardware, we must move beyond basic settings and into low-level tuning. This is where we address the architectural issues that cause DPC latency and input lag. By stripping away virtualization layers and fine-tuning how the OS handles task scheduling, we can minimize the driver overhead that causes those infuriating audio pops and frame-time spikes. This technical layer is what separates a standard ‘gaming PC’ from a low-latency competitive machine.
- Disable Hyper-V and VBS (Core Isolation): For the absolute lowest input latency, especially in VR or simulation titles like DCS, disabling ‘Memory Integrity’ in Windows Security can remove hypervisor scheduling overhead. This eliminates the ‘hypervisor is active’ warning and stabilizes frame times.
- Manage CPU Affinities with Process Lasso: If you’re on a single-CCD X3D chip (like the 7800X3D or 9800X3D), ensure all 8 cores are available to the game. Avoid forcing affinities unless you’re isolating a specific background process that is known to fight for the same cores as your game engine.
- Optimize Global Timer Resolution: Use a tool like TimerResolution to force a 0.5ms system timer. This ensures the CPU checks for tasks more frequently, reducing the variance in when an input is processed and a frame is rendered.
- NVIDIA Control Panel Latency Tuning: Set ‘Power management mode’ to ‘Prefer maximum performance’ on a per-game basis. Keep ‘Low Latency Mode’ to ‘Off’ or ‘On’ (not Ultra) if the game supports NVIDIA Reflex, as Reflex provides more efficient engine-level latency management.
- Prune Unused Audio and Startup Services: Every enabled audio device (like virtual cables or unused monitor speakers) forces the OS to enumerate them at boot and during state changes. Disable unused devices in Sound Settings and turn off niche services like LeapMotion or CaptoGlove to reduce system ‘noise.’
Power Plans and Thermal Management: Beyond ‘High Performance’
One of the biggest misconceptions in the community is that the ‘High Performance’ power plan is mandatory for gaming. In reality, ‘High Performance’ often just disables CPU idling, keeping your clock speeds pegged at maximum even when the system is doing nothing. This leads to higher idle temps, aggressive fan noise, and reduced C-state residency. My analysis suggests that the ‘Balanced’ plan is superior for 99% of users: it allows the CPU to downclock during idle while still reaching full boost clocks instantly under load, thanks to modern UEFI-CPPC (Collaborative Processor Performance Control).
- Stick to the ‘Balanced’ Plan: This ensures your CPU can enter low-power states when not gaming, reducing heat and fan noise without sacrificing peak in-game performance.
- Enable ‘Active’ System Cooling Policy: In Advanced Power Settings, set the cooling policy to ‘Active.’ This instructs Windows to ramp up fan speeds *before* throttling the CPU, ensuring you maintain boost clocks during long gaming sessions.
- Use ‘Ultimate Performance’ Sparingly: This plan is hidden by default and is only beneficial for workstations running constant parallel workloads. For gaming, it often provides 0% gain while significantly increasing power consumption.
- BIOS-Level Fan Curves: Instead of software, use your BIOS/UEFI to set custom fan curves. This ensures your fans respond to thermal changes at a hardware level, bypassing OS-level latency and preventing ‘fan hunting’ where speeds fluctuate rapidly.
- Monitor with HWMonitor: Regularly check your CPU and GPU temperatures. Keeping your CPU below 90°C and GPU below 85°C is critical to prevent thermal throttling, which is a far more significant performance killer than any Windows setting.
The Forbidden Fruit: Custom Windows ISOs
For those who feel a deep resentment toward Microsoft’s bloatware, custom ISOs like AtlasOS, Ghost Spectre, or ReviOS are the ‘Forbidden Fruit.’ These builds are aggressively stripped of telemetry, Windows Defender, and non-essential services. The appeal is a ‘raw’ OS that uses less than 1GB of RAM at idle and feels incredibly snappy. However, this performance comes at a cost: you are essentially trusting a third-party developer with the core security of your system, which is a significant risk for any machine used for banking or personal data.
Custom Windows ISOs (Benefits)
- Extreme Resource Recovery: Idle RAM usage can drop below 1GB, and background processes are cut by 70%.
- Lower Latency: Stripping the OS core can lead to measurably better 0.1% Low FPS and frame-time stability.
- No Telemetry: Completely removes Microsoft’s data-tracking components.
- Faster Boot and UI: The system feels significantly more responsive, similar to Windows 7.
Custom Windows ISOs (Risks)
- Security Vulnerabilities: Many builds disable Windows Update or remove security features like Defender and VBS, leaving you exposed to kernel-level exploits.
- Malicious Software Risk: You are installing a modified OS from an unofficial source; there is no guarantee against embedded backdoors.
- Antivirus Flags: Legitimate security software will often flag these ISOs as malware due to their highly modified system files.
- Lack of Support: If a game or driver breaks, you cannot expect official support from Microsoft or hardware vendors.
- System Instability: Over-aggressive debloating can break features like the Microsoft Store, Xbox Game Pass, or specific hardware drivers.
Given these significant risks, LoadSyn strongly recommends trying custom ISOs only in a virtual environment or on a secondary, non-critical machine. Proceed with extreme caution and only if you fully understand and accept the potential security and stability trade-offs.
Beyond the OS: Hardware & Ecosystem Considerations
While software optimization is crucial, the underlying hardware also plays a significant role in your system’s overall performance. Ensuring your system meets (or ideally, exceeds) Windows 11’s minimum requirements is foundational. Furthermore, the broader ecosystem choice between Windows and macOS presents different performance profiles, especially for intensive tasks like gaming or video upscaling, where Windows often holds a distinct advantage due to its unparalleled hardware flexibility and vast game catalog. Understanding these differences helps in making informed decisions about your entire computing setup.
| Criteria | Windows 11 | macOS |
|---|---|---|
| Hardware Flexibility | Unmatched variety, custom builds, wide component support, diverse price points. | Limited to Apple’s premium hardware, less upgradeable, higher initial cost. |
| Gaming Performance | Dominant platform for AAA titles, superior GPU/CPU options, Game Mode, Auto HDR, DirectStorage. | Limited game catalog, better performance on Apple Silicon for creative tasks but generally not gaming, Game Porting Toolkit is improving. |
| Stability (OS Control) | Improved, but still susceptible to third-party driver issues; requires more user maintenance. | Excellent due to tight hardware/software integration; automated, invisible background maintenance. |
| Customization | High degree of user control over OS and interface, extensive tweaking options. | Highly curated, less user customization, focused on a controlled, consistent experience. |
Future Outlook: What’s Next for Windows Performance?
Microsoft is not entirely ignoring the performance feedback. They are actively testing further enhancements, including more refined File Explorer preloading and UI decluttering, with a general rollout anticipated in early 2026. However, the slow adoption rate of Windows 11 and ongoing user dissatisfaction underscore the need for more fundamental architectural improvements rather than incremental fixes. The hope remains that future ‘Moment’ updates or a potential Windows 12 will deliver the truly snappy, optimized experience that gamers and power users demand, finally aligning Microsoft’s vision with user expectations.
Frequently Asked Questions
Does Virtualization-Based Security (VBS) really kill gaming performance?
On modern hardware (Intel 7th-gen/AMD Zen 2 or newer), the impact is negligible, typically 1-3%. These CPUs have hardware-level MBEC support that handles the security overhead. You will only see a significant hit (up to 10%) on legacy CPUs that must emulate these features in software.
What should I do if LatencyMon shows high DPC latency spikes?
Identify the driver in the ‘Drivers’ tab. If it’s nvlddmkm.sys, perform a clean GPU driver install using DDU. If it’s Wdf0100.sys, check for chipset updates and disable unused USB or audio devices. High DPC latency is the primary cause of audio pops and micro-stutters.
Are custom debloated Windows ISOs (like AtlasOS) safe for my main PC?
No. While they offer extreme performance gains, they are third-party modifications that often disable critical security updates and Windows Defender. They should only be used on dedicated gaming machines that do not contain personal data or for benchmarking purposes.
Why is ‘Balanced’ power plan recommended over ‘High Performance’?
Modern CPUs use CPPC to ramp up to full boost clocks in milliseconds. The ‘High Performance’ plan keeps the CPU at max clock constantly, which increases heat and fan noise without providing a measurable FPS gain over the ‘Balanced’ plan in actual gameplay.
Can I fix the slow Windows 11 File Explorer?
You can mitigate it by setting File Explorer to open to ‘This PC’ instead of ‘Home’ and disabling transparency effects. However, the core slowness is architectural (WinUI overlay), and a true fix requires Microsoft to optimize the underlying XAML rendering code.
Windows 11 is a frustrating paradox of modern aesthetics and legacy overhead, but the ‘bloatware betrayal’ doesn’t have to be your reality. By moving beyond the VBS myths and focusing on the empirical killers like DPC latency and background service bloat, you can reclaim your hardware’s agency. Whether it’s through surgical debloating, intelligent power management, or the high-risk gamble of custom ISOs, the path to a low-latency, high-performance system is now visible. Don’t let the OS work against you; use these evidence-based tunings to ensure your $3,000 rig actually feels like one. Reclaim your PC, optimize with precision, and get back to the game.